Running locally (LM Studio)
This guide shows you how to run Ai2’s Olmo models locally using LM Studio. You’ll learn how to download a model through the LM Studio interface, test it in the built-in chat UI, and interact with it programmatically using Python or TypeScript via the local OpenAI-compatible server.
Prerequisites
Before you start, make sure you have the following:
- Sufficient Hardware: Running a 7B model locally is demanding. Your computer should have at least 8 GB of RAM, but 16 GB is recommended for better performance. You will also need at least 5 GB of free disk space for the model file.
- LM Studio Installed: Download and install the LM Studio application from the official website.
1. Download the Model
LM Studio features a built-in search engine to find and download models directly from Hugging Face:
- Open LM Studio and click the Discover option (🔍) on the left sidebar to navigate to the search page.
- In the search bar, type Olmo-2-1124-7B-Instruct-GGUF and press Enter to search for the Olmo model.
- From the search results, select a repository. We recommend
bartowski/Olmo-2-1124-7B-Instruct-GGUF. - On the right-hand panel, you will see a list of available model files. For a good balance of performance and quality, select the
olmo-2-1124-7b-instruct.Q4_K_S.ggufmodel. - Click the Download button to start downloading the model.
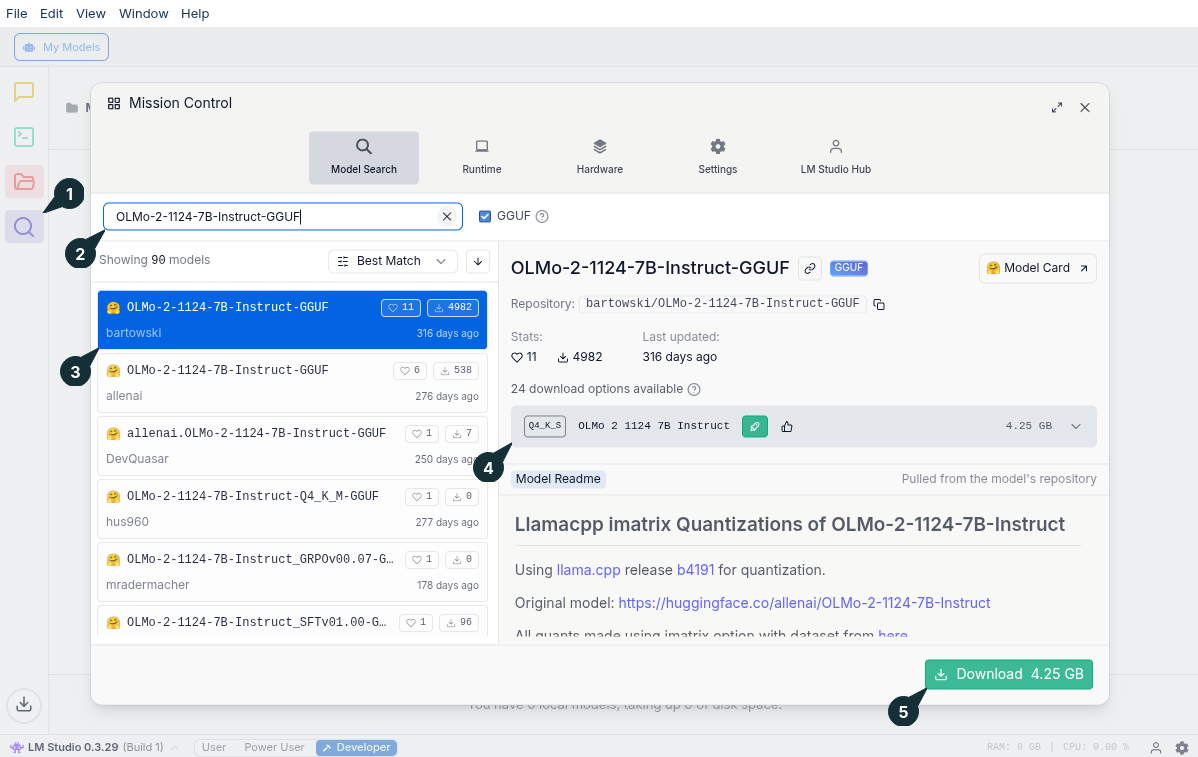
You can monitor the download progress in the bottom panel of the application.
You can use this same process to download any Olmo model available on Hugging Face.
2. Test the Model in the Chat UI
Once the model is downloaded, you can start a conversation through the chat interface to test the Olmo model:
- Navigate to the Chat tab by clicking the speech bubble icon 💬 on the left sidebar.
- At the top of the screen, click the dropdown menu.
- Select the
Olmo 2 1124 7B Instructmodel you just downloaded to load it into memory. - After the model finishes loading, you can start typing prompts in the message box at the bottom and receive responses.
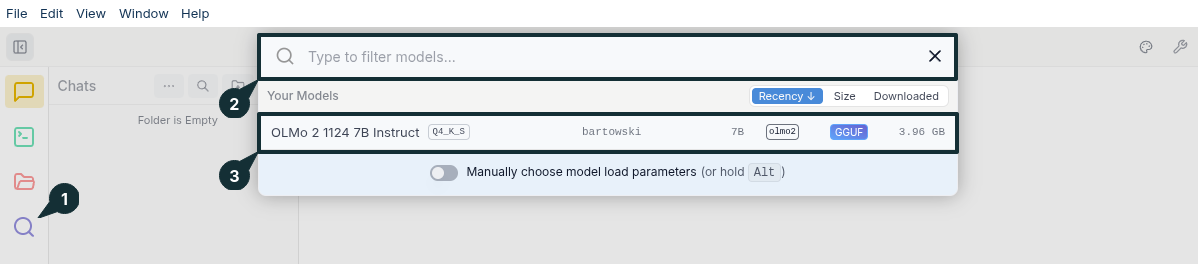
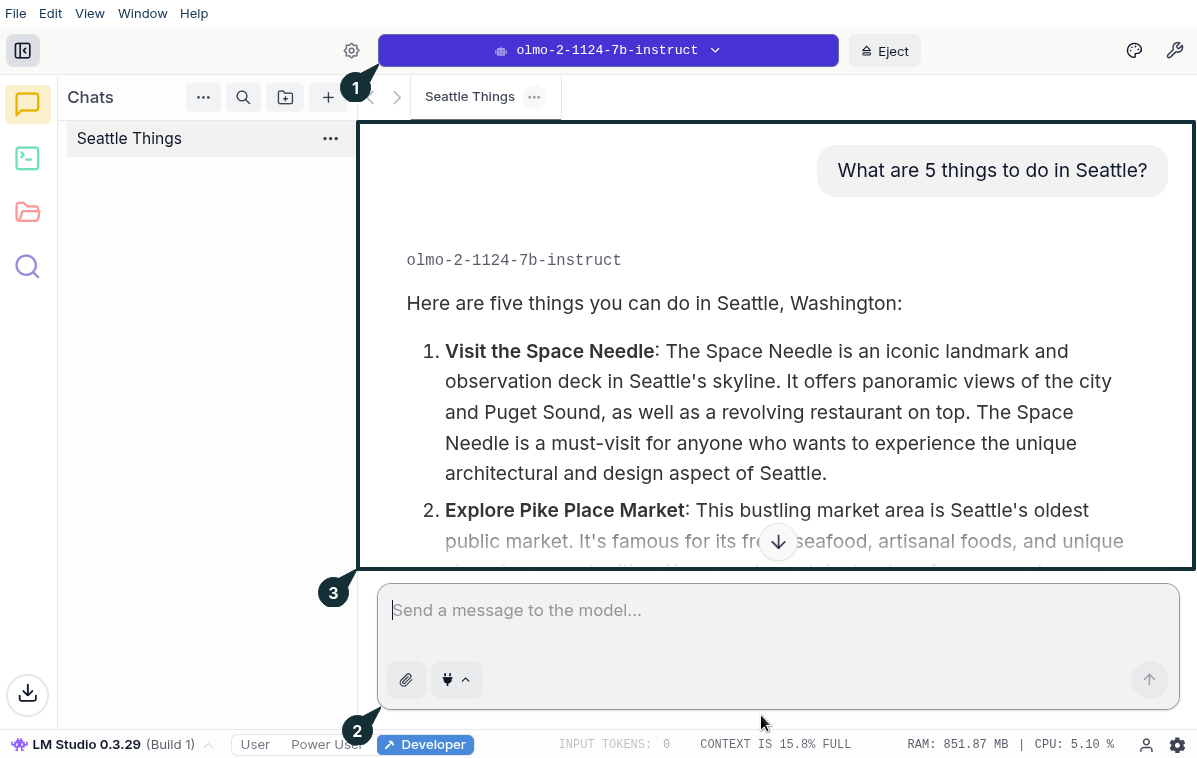
When the model is loaded, you will see its name at the top. You can now interact with it by typing prompts in the message box at the bottom.
3. Test Programmatically via the Local Server
LM Studio includes a built-in server that exposes an OpenAI-compatible API, allowing you to integrate the local model into your applications.
- Navigate to the Local Server tab by clicking the
>_icon on the left sidebar. - Select the Olmo model (
Olmo 2 1124 7B Instruct) from the dropdown at the top to load it. - After loading, the model will show up in the dashboard with the
READYstatus, indicating it's completely loaded. - Use the Status toggle to make sure the server is Running.
- The Developer Logs section will display the message
Server started, indicating you can now send requests to the server. - The server URL and the model to use when sending the request are shown on the right side of the dashboard.
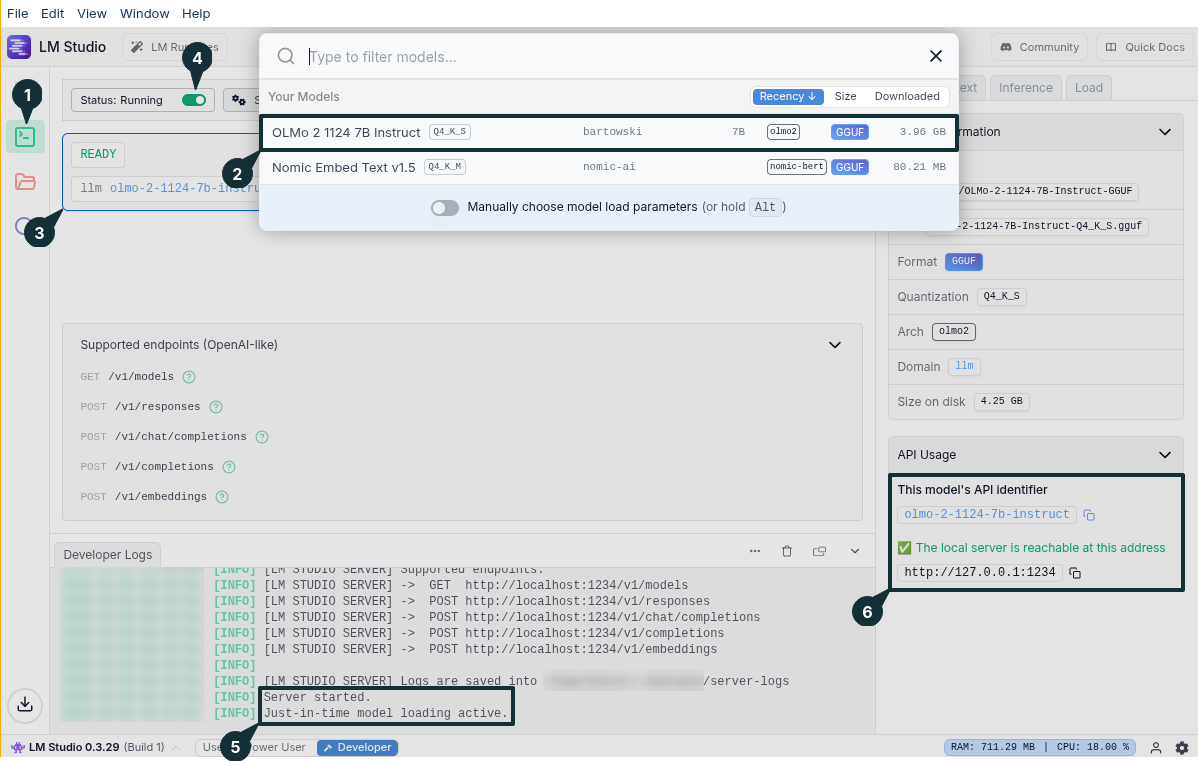
Once the server is running, you can send requests to it using the following code examples.
- Python
- TypeScript
If you want to test it using Python, first install the openai library if you haven't already.
pip install openai
Create a file named test_lmstudio_olmo.py. Note that the base_url points to LM Studio's default port, 1234 (http://127.0.0.1:1234/v1).
Remember to include /v1 in the base_url. If you changed LM Studio’s port, update it accordingly.
from openai import OpenAI

# Initialize the client to point to the local LM Studio API
client = OpenAI(
    base_url="http://localhost:1234/v1",
    api_key="not-needed", # required, but unused
)

print("Sending request to local Olmo model...")

# Send a request to the Olmo chat model
response = client.chat.completions.create(
  model="bartowski/olmo-2-1124-7b-instruct-gguf", # Model loaded in the server
  messages=[
    {"role": "user", "content": "What are 5 things to do in Seattle?"}
  ]
)

# Print the model's response
print("\n--- Model Response ---")
print(response.choices[0].message.content)
Execute the script from your terminal:
python test_lmstudio_olmo.py
If you want to test it using TypeScript, first set up a Node.js project and install the necessary packages.
# Initialize a Node.js project
npm init -y

# Install the OpenAI client and TypeScript dependencies
npm install openai
npm install -D typescript @types/node
Next, create a tsconfig.json file to configure the compiler.
{
  "compilerOptions": {
    "target": "ES2022",
    "module": "NodeNext",
    "moduleResolution": "NodeNext",
    "outDir": "./dist",
    "esModuleInterop": true,
    "strict": true
  },
  "include": ["*.ts"]
}
Now, create a file named test_lmstudio_olmo.ts.
import OpenAI from 'openai';

// Initialize the client to point to the local LM Studio API
const client = new OpenAI({
  apiKey: 'not-needed', // required, but unused
  baseURL: 'http://localhost:1234/v1',
});

console.log('Sending request to local Olmo model...');

// Send a request using top-level await
const resp = await client.chat.completions.create({
  model: 'bartowski/olmo-2-1124-7b-instruct-gguf', // Model loaded in the server
  messages: [{ role: 'user', content: 'What are 5 things to do in Seattle?' }],
});

console.log('\n--- Model Response ---');
console.log(resp.choices[0].message.content);
Finally, compile and run your script.
# Compile the .ts file
npx tsc

# Run the compiled .js file
node dist/test_lmstudio_olmo.js
You should see the model's response printed to your console, as the following example output illustrates:
Sending request to local Olmo model...

--- Model Response ---
1. Explore Pike Place Market: This historic marketplace offers a wealth of shopping, dining, and entertainment options, including fresh seafood, artisanal goods, and live music performances.

2. Visit the Space Needle: A must-see landmark, the Space Needle provides panoramic views of Seattle's skyline and Puget Sound, offering an iconic experience that captures the city's modern architectural style.

3. Walk the Chihuly Garden and Glass: This stunning exhibit showcases the work of renowned glass artist Dale Chihuly, featuring intricate installations and a spectacular fountain lit by colorful glass.

4. Enjoy the views from Capitol Hill: Take a stroll through Capitol Hill, a vibrant neighborhood known for its coffee shops, boutique shopping, and LGBTQ+ community, before heading up to the View from Fairview Park for breathtaking city vistas.

5. Explore the Seattle Aquarium: Dive into marine life at the Seattle Aquarium, home to diverse aquatic creatures from both local waters and around the world. The aquarium features interactive exhibits, conservation programs, and an underwater tunnel that offers a close encounter with fish.